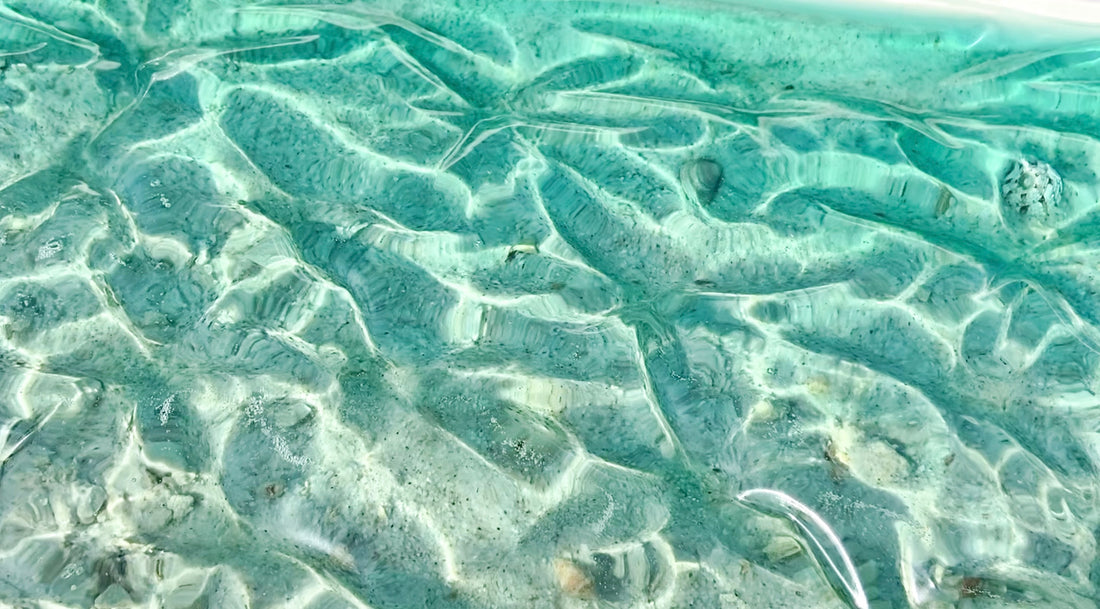
Dreaming of your next beach vacation? Bring the turquoise waters and white sandy beaches to your home with this stunning DIY textured seascape. The realistic ripples reflect light and and cast shadows on a shell and sand seabed, making you feel like you're gazing into the ocean—and creating this effect is easier than it looks!
Resin artists Nadia (@summergirldesigns) and Sandra (@wildheartresinart), a talented mother-daughter team from Croatia, create beautiful art inspired by nature and the sea.
In this beginner-friendly tutorial, they'll guide you step-by-step to make your own textured ocean resin art, bringing a tropical beach vibe to any room.
Ready to dive in?
Let's get started!


Watch the complete video tutorial:
What You’ll Need:
- White shadow box frame, 1-1.5" deep to contain the resin, with a sturdy backing
- PVA wood glue (water resistant and clear drying)
- Pebbles (such as aquarium gravel)
- Sand
- A few shells
- 2 plastic containers (such as large yogurt containers) to mix the pebble & sand mixtures
- Pouring medium (such as Liquitex)
- Sturdy wood stir stick (like the free ones you get with house paint)
- ArtResin
- Mixing container
- Stir stick
- An assortment of plastic containers & stir sticks to mix the tinted resin
- Emerald Green liquid pigment
- Aqua and Teal Alcohol Ink
- Alcohol wipes
- Dust cover
- Painter's tape
- PVC vinyl, slightly larger than your frame
- Small stones to weigh down the vinyl
- Scissors
- Heat gun
- X-acto or utility knife
Step 1: Prepare The Frame
For this project, it's important to use a 1-1.5" deep shadow box picture frame, as it has the depth needed to contain multiple layers of resin.
Place the frame face down on your work surface, with the backing securely clipped in place.
💡 TIP: If there are any large gaps or the backing has broken corners, fill the gaps with something sturdy like a piece of the matte board, plastic, or masonite cut to fit.


Apply a line of wood glue around the inside perimeter of the frame to ensure all the edges are sealed.


Step 2: Create The Base Layer
Place the pebbles into a plastic cup, roughly the size of a large yogurt container.

Pour the sand into a second container. Use any shade of sand you prefer. For this project, Sandra combined white, beige, and brown sand for a natural look.


Add wood glue and pouring medium to the containers.


Stir well until each pebble is coated.

Stir the sand mixture until it forms a spreadable paste. You may need to add some water to make it more fluid.


Create an organic, irregular pattern with the sand for a natural look.

On the opposite side of the frame, spread out the pebble mixture. Distribute it evenly and press it into place with a wooden stick. Leave a wide gap between the pebbles and sand.


Use gloved hands to ensure the pebble mixture is pressed into the frame corners and edges.

Add wood glue and water to the remaining sand in your cup to create a thin paste. Pour this mixture into the gap, spreading it out to fill the space between the pebbles and sand.


Before the wood glue dries, scatter a few pebbles and shells randomly over the entire surface to replicate the ocean floor. Gently press the shells into the wet sand for a natural look. Allow to dry overnight.

Step 3: Pour The First Resin Layer
Next day, once the glue has dried, prepare the ArtResin.
If you're unsure how much resin to use, enter the length and width of your frame into our Resin Calculator. For example, a 12 x 16" frame requires 7 oz of resin per 1/8" or 3 mm layer.
💡 TIP: Keep in mind, to achieve a thick coat like Sandra did, you will need to double this amount per layer. Since Sandra poured 2 layers, you will need 4 times the amount the calculator recommends to complete this project.

Wearing gloves, measure equal volumes of resin and hardener in a graduated mixing cup. Stir well for 3 minutes, scraping the sides and bottom of the container to ensure thorough blending.

Separate the resin into three cups: one small and two medium-sized cups and add the colorants as follows:
-
Small Cup: mix a few drops of emerald green liquid pigment + aqua alcohol ink for the most concentrated color
-
Medium Cup 1: mix a few drops of emerald green liquid pigment
- Medium Cup 2: mix drops of emerald green liquid pigment until the color falls in between the lightest and darkest tints.

Allow the resin to sit for a few minutes to allow bubbles to rise to the surface, then use a heat gun to pop them.
⚠️ HEAT GUNS & ALCOHOL INK: Alcohol ink is flammable. To stay safe, always use a heat gun instead of a flame torch to pop bubbles.

Pour the mid-tinted resin in the center of the frame.

Next, pour the most translucent resin over the pebble area, spreading it out to the edges with a craft stick.


Then, pour the most pigmented resin over the sand area, using a craft stick to spread it out, ensuring it reaches the sides and corners of the frame.


Pop bubbles with torch or heat gun.

Using the craft stick, blend the layers of resin to soften where they meet and remove any harsh lines, gently blending lighter and darker areas together. Remove bubbles with a heat gun a final time.


While the resin is still wet, carefully wipe the edges of the frame with an alcohol wipe to remove drips. Cover and allow the resin to cure overnight.

Step 4: Pour The Second Resin Layer
As in the previous step, prepare a second batch of carefully measured and mixed ArtResin.

Portion out the resin into 3 cups as follows:
In the small cup, add emerald green liquid pigment + teal alcohol ink.

In a medium cup, add slightly less emerald green and teal alcohol ink for a slightly less concentrated color.

In the second medium cup, add a few drops of emerald green liquid pigment to create the most translucent color.

Set the resin aside for 5-10 minutes to allow bubbles to rise to the surface. Meanwhile, tape off the edges of the frame with painter’s tape to protect it from drips.

Start by applying some of the most translucent resin on the pebble side. Reserve some of the resin for touch-ups.

On the opposite side, pour the darkest resin from the small cup over the sand side.

Next, fill the middle with the medium shade of resin.

Top up the lightest resin, using a craft stick to ensure the resin is spread evenly along all the edges.


Use a heat gun to pop bubbles.

Cut a piece of clear PVC vinyl slightly larger than the frame and apply it over the wet resin. The vinyl will create a rippled texture to replicate water.

To help the vinyl scrunch up, go over it lightly with the heat gun to soften it.

Create a ripple pattern to replicate ocean waves.

Place a small, weighted object on top to maintain the shape while the resin cures. Sandra used small stones. Allow the resin to cure overnight.

If necessary, carefully use the heat gun to further soften/scrunch the vinyl in areas that may need it.

Finally, with a gloved hand, make your way around the frame to ensure the vinyl adheres to the inside edges of the frame. This will help make sure the resin cures evenly. Allow the resin to cure overnight.

Step 5: Final Touch Ups & Reveal
The next day, while the resin is dry to the touch but still flexible, remove the vinyl and the tape.


Use a blade to trim any resin that may have splashed up the inner sides of the frame. Carefully cut along the edge and peel off the excess resin. Do this promptly while the resin is still flexible and easy to remove.


Your textured ocean resin art is now ready for display!

We hope you enjoyed learning how to create your own textured beach art by following along with Nadia and Sandra!
To see more of their work:
Follow Sandra on Instagram: @wildheartresinart
Follow Nadia on Instagram: @summergirldesigns
Visit their Etsy shop: @SummerGirlArt
Watch their resin tutorials: @SummerGirlDesigns
Once you've mastered this technique, take things a step further by using a wood panel instead of a shadowbox frame. You'll have a piece with the same gorgeous rippled look, but the exposed edges will let in more light to illuminate the resin!
- Simply create a dam/border around the edge of the panel with tape, to contain the resin.
- Apply the sand, pebbles, and tinted resin following the directions in the tutorial.
- Once the resin is dry to the touch, remove the tape.
- Trim or sand down any sharp edges.
If you try either of these techniques out, don't forget to tag us with @art_resin on Instagram!
Please leave any questions or comments below :)
ArtResin: The Original Epoxy For Resin Art.
